Texture: Mix for a Tender Rise
Even a gram-perfect recipe turns chewy and tunneled if handled with a heavy whisk. Because muffin batters carry roughly twice the water-to-fat ratio of pound cakes, free water rushes into flour proteins the instant wet meets dry. Learning to read the surface texture of your bowl at stroke 5, stroke 12, and after a 45-minute rest puts you in full command of crumb tenderness.
Visual Mixing-Stage Sequence
Observe the three distinct mechanical stages below when folding wet emulsion into dry ingredients with a 7cm-wide silicone spatula.
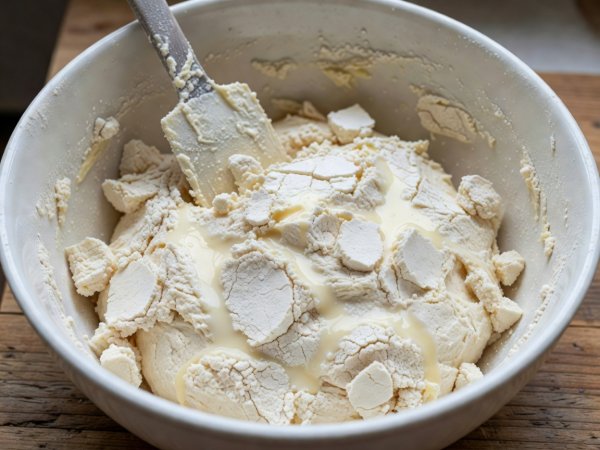
Stroke 05: Shaggy Hydrating Mass
Large dry pockets remain at the bottom of the bowl while liquid pools around the edges. If you add inclusions now, you can fold them in during the remaining strokes without exceeding your total shear budget.
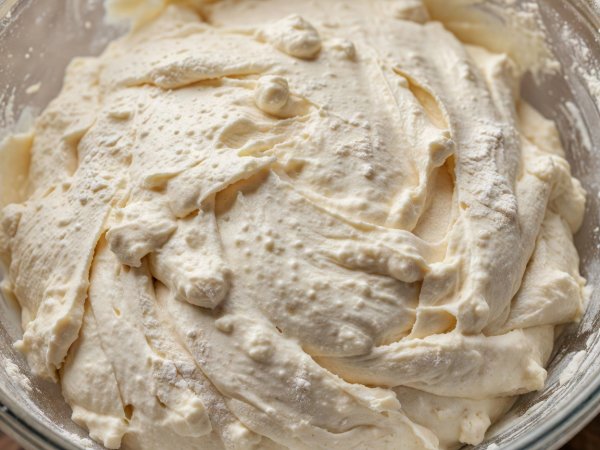
Stroke 12: Pebbled & Matte (Target Stop)
No dry flour pockets sit at the bottom of the bowl, yet the surface looks bumpy, matte, and faintly streaked with flour dust. These small lumps dissolve effortlessly via thermal diffusion during the rest and early bake.
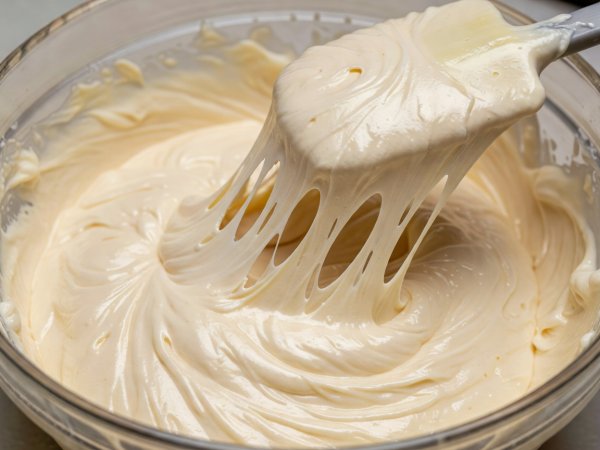
Stroke 30: Glossy & Elastic (Overmixed)
The batter looks silky, shiny, and forms long elastic ribbons when lifted. Gluten sheets have aligned across the bowl. Baking this batter yields pointed volcano tops and rubbery interior tunnels.
Three Mixing Pathways Compared
While the two-bowl muffin method is the quickest path, pastry chefs also deploy creaming and reverse-creaming depending on the desired crumb tightness and shelf life.
- The Classic Two-Bowl Method: Whisk dry ingredients in one bowl; emulsify liquid fat, eggs, sugar, and dairy in a second bowl; fold together in 12 strokes. Produces an open, coarse, irregular crumb with crisp crust contrast. Best consumed within 18 hours.
- The Creaming Method (Butter + Sugar): Aerate softened butter (18°C) with sugar for 3 minutes before adding eggs and alternating flour and milk. Produces a fine, cake-like pore structure with high dome stability, though slightly less moist when eaten straight from the refrigerator.
- The Reverse-Creaming / Sanding Method: Coat the dry flour and sugar directly with softened butter and oil until it resembles damp sand before adding liquids. By wrapping glutenin and gliadin proteins in a hydrophobic lipid film before water arrives, it becomes virtually impossible to overmix.
Temperature Matching Prevents Curdling
If you whisk 4°C cold eggs and refrigerated buttermilk into 45°C melted butter, the butterfat solidifies instantly into waxy yellow granules. Instead of coating flour evenly, those solid fat pellets melt in the oven to leave irregular grease holes.
The Fix: Bring eggs and cultured dairy to 20°C–22°C (68°F–72°F) in a warm water bath for 10 minutes before whisking into cooled melted butter.
Why Overnight Cold Conditioning Works
Commercial artisan bakeries rarely scoop batter straight from the mixer into the oven. Holding mixed batter covered at 4°C (39°F) for 8 to 16 hours triggers three beneficial physical changes:
- Passive Starch Hydration: Water migrates into the core of endosperm particles without mechanical agitation, raising batter viscosity by up to 35%.
- Gluten Relaxation: Any tension introduced during the 12-stroke fold relaxes as protease enzymes gently cleave strained peptide bonds.
- Flavor Deepening: Amylase enzymes convert trace damaged starches into maltose and glucose, giving the baked crown a richer mahogany caramelization and subtle malted aroma.
Do not stir chilled batter after removing it from the refrigerator; scoop directly from the cold bowl into prepared tins so trapped gas vesicles remain intact.